How do I Edit a Shopify Store Theme with the Theme Editor

Shopify designers, website owners, and brand managers alike all spend a lot of time working with the visual appearance of a store. On Shopify, the easiest way to ensure a website has the right aesthetic appeal, is to choose a specific “theme” to build on. There are dozens of great Shopify themes available, including both free and premium options.
However, even if you spend hours sorting through all of the available themes to pick perfect option, there’s still a chance your chosen design won’t be absolutely perfect for your client or site. That’s why most Shopify themes are customizable.
The good news for designers and business owners is that adjusting a theme can be more straightforward than it seems. In fact, there are two answers to the question “How do I edit a Shopify store theme?” You can either directly edit the Shopify theme files, which requires a little coding knowledge, or, if you’re not a fully fledged Shopify developer, you can use the Shopify theme editor.
Today, we’re going to be looking specifically at how you can edit your Shopify store with the theme editor. (Stay tuned for our article on editing Shopify theme code…)
How to Edit Your Shopify Store Theme with the Theme Editor
Let’s dive into editing your store with the “Theme Editor”. This is a tool built into Shopify which allows you to make simple change to your store theme. You can find it by going into the “Online Store” section of your site, then clicking on “Themes”. Click on the theme you want to edit, and click “Customize”.
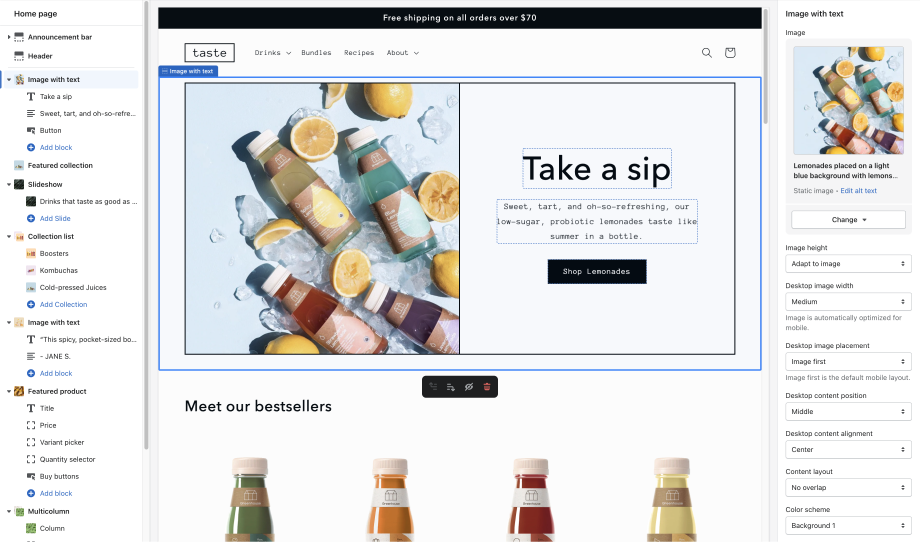
You’ll be taken to the Theme Editor, which displays a tree view of all your content in the template, positioned in the sidebar. You can expand each section using the arrows.
Using the Theme Editor, you can change the general settings of the theme, and therefore the look and feel of the store. You should be able to customize the following:
- Colors: Alter the colors of your website to suit your brand’s color palette. You’ll be able to change the colors for accents, backgrounds, buttons, and text.
- Typography: You can also experiment with different fonts and typefaces in your settings.
- Layout: You’ll be able to update the page width, grid, and vertical spacing options.
- Buttons: You can change how your buttons look by customizing shadows and borders.
- Favicon: Here you can upload your favicon image.
- Checkout: Change the design and layout of your checkout page
Exactly what you can customize within the theme editor varies depending on the theme you’re using. It’s worth checking the customizable options in your theme before adding it to your store.
Using the Shopify Preview Inspector
One of the best tools you can use if you’re editing your Shopify store with the “Theme Editor” is the Preview Inspector.
This is a relatively new addition to the Shopify toolkit, which allows users to navigate to specific blocks and sections from within their preview window, to find corresponding settings faster. You can use the Preview Inspector for all free Shopify themes as default, to reorder, hide, edit, or delete sections instantly.
When the Preview Inspector is enabled, you’ll be able to click on any “outlined” component to open the settings options. The “solid blue” outline highlights the current active section, while a dotted blue line defines an associated block connected to that section.
Within the Preview Inspector, users can add sections or blocks to their themes directly within the preview window. On mobile, it’s possible to add, hide, delete and move sections too.
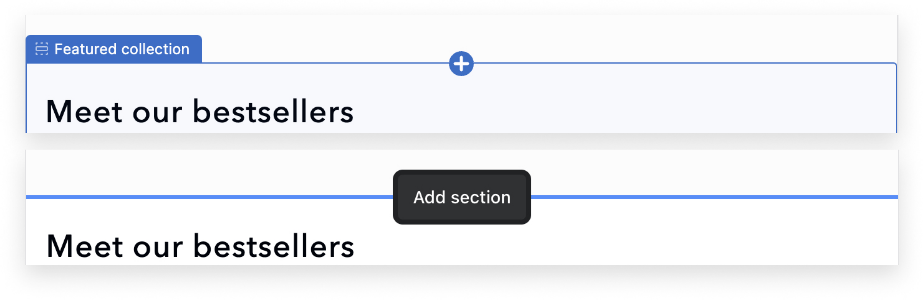
The “Add Section” option appears at the bottom and top of each selected section, allowing users to add components wherever they like. The “Add Block” option will appear when you move your cursor onto an existing block. It also gives you free choice of what kind of blocks you can add.
Other Preview Inspector tools include:
- Move: Users can move a block or section to a previous or next position just using the arrow icons in the Preview Inspector. For instance, you can move the selected section to the bottom or top of the page.
- Hide: Clicking on the eye icon allows users to hide a specific block or segment. However, it’s not possible to unhide a segment after it’s been hidden. The only way to unhide a segment or block is to click on the “Undo” button or close the settings panel and go back to the theme editor home page.
- Delete: Users can also click on the trash can icon to delete a selected block or section.
What Else Can You Do in the Theme Editor?
The Theme Editor comes with two modes to choose from, so designers, developers, and business owners can make the most of their screen space. The double sidebar mode is intended for larger screens and browser windows, while the single sidebar mode is for smaller screens.
With both options, you’ll be able to adjust sections and blocks, with all of the components of each page shown by default. Sections making up the header and footer of a page are usually collapsed as standard, but you can click the arrow button to view them. You can also delete a block or section from a template with the “remove section” button, without having to go into the Preview Inspector.
It’s also possible to access all of a themes “template” from the page selector at the top of the theme editor. Companies and designers using an Online Store 2.0 theme can create new templates directly from the page selector with the “New Template” option.
Additionally, when you view a template, you can preview how its going to look with any compatible resource within your store. For instance, if you view a product template, you can test what it’s going to look like with a product in your store.
To preview templates with specific resources, just click on the template you want to preview, and click on “Change” in the preview section. Then choose the resource you want to preview in the “Select” menu.
Finally, you can undo and redo actions within the theme editor too. All you need to do is click on the buttons on the top right of the page.

Before You Edit Your Shopify Theme: Quick Tips
Before you start making any UX/UI and aesthetic tweaks to your Shopify theme, it’s important to prepare properly. Whenever you’re going to be making changes to your Shopify theme, whether it’s through the theme editor, or the code editor, the changes will go live as soon as you click “Save”.
This means a minor error in your strategy could break the entire visual design of your store. With this in mind, it’s worth backing up your theme before you do anything. You can duplicate your theme using the instructions outlined here, so you can easily discard your changes if necessary.
Before you edit your theme, you should also:
- Brush up on some code: Even if you’re not going to be editing the code directly, it’s worth having a basic knowledge of how Liquid and HTML works on Shopify.
- Consider working with an expert: If you’re not a Shopify developer or designer, you can hire an expert from Storetasker to handle your theme changes for you.
- Learn the best practices: Make sure you check out the Shopify documentation so you have an idea of what you can do when it comes to uploading images and making other changes.
If you want to edit your theme with code, stay tuned for an upcoming blog post.


Shopify Expert?


