Linking Products With Swatches on Shopify
What I’ve been thinking about:
I’ve had a lot of clients in the past and some recently who want separate products in the back end linked on the front end. All clothing companies. The solution I will share below is an easy solution for both you and the client!
This setup is particularly advantageous if your customers shop by color and/or the size of your store's product catalog is rather small. For smaller stores with fewer products, having separate products for each variant can make the store look fuller and more robust. When these products are linked together via swatches on the front end, they appear as one cohesive product within the product page, providing a seamless and engaging user experience.
Additionally, if you advertise your products differently based on color, this method works exceptionally well. Each variant can have its unique URL, allowing for targeted marketing and improved SEO, as each color option can be optimized for search engines. This approach not only enhances the visual appeal and organization of your storefront but also allows for more flexible and effective marketing strategies. Overall, this solution provides both operational efficiency and marketing advantages, making it an excellent choice for many clothing companies.
Let’s dive into it!
Step 1: Create/Edit Products to Link Together
- Create Linked Products
First, navigate to your Shopify admin and go to the Products section. You will need to create separate products that you want to link together. For instance, if you have three different color variants of the same shirt, you would create three separate products.

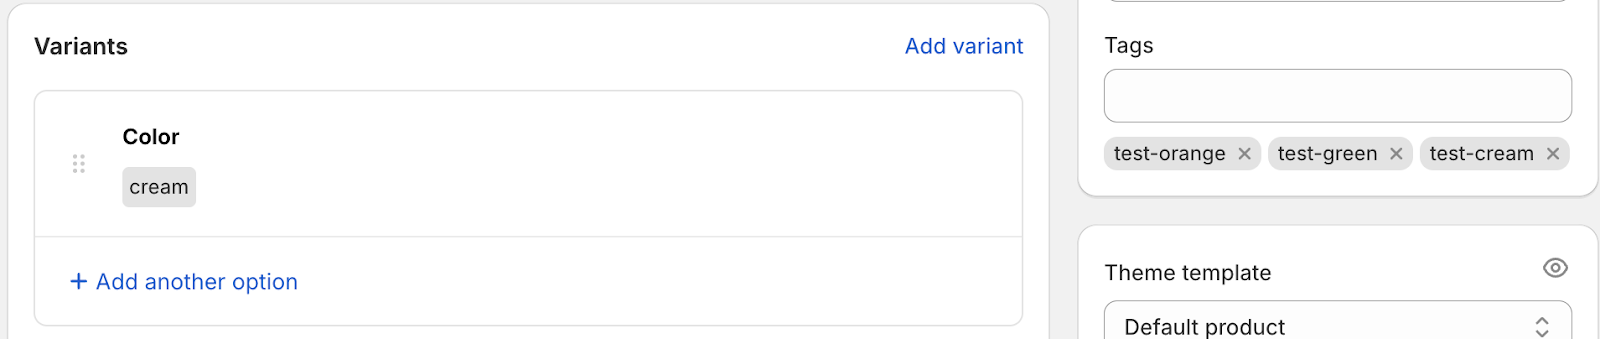
- Add Variant Option & Product Tags
After creating the products, add a new option for the product variant. This will be the attribute that links these products together, such as "Color".
To link these products together on the front end, you need to add specific tags to each product. These tags should be the product handles of all the linked products. This way, each product is tagged with the handles of the other variants, allowing them to be identified and linked correctly on the front end. Ensure that each product has a unique URL handle that reflects its variant. You can find the product handle in the Search engine listing preview section.

Step 2: Add Swatches to Store Files
To create a cohesive shopping experience, you'll need to add swatches that represent the different variants of your products.
- Create Swatch Images:
- Screenshot Method: Take a small screenshot of each product variant that accurately represents the color or style.
- Design Method: Create custom swatch images using a graphic design tool to ensure consistency and quality.
- Upload Swatch Images:
- Navigate to the Content section in your Shopify admin, then click on Files.
- Upload your swatch images here. Make sure to follow a consistent naming convention for your swatch files. The file name should be in the format swatch-. This will help the code to correctly identify and use the swatch images.
- For example:
- swatch-test-orange.png
- swatch-test-cream.png
- swatch-test-green.png
- If no swatch image is provided for a variant, the CSS code will display a background color based on the variant name. For example, if test-orange had no swatch file, it would default to a generic orange background color.
- Note that these generic background colors will only work for color names supported by CSS. For instance, common color names like "orange" will display correctly, but unsupported names like "cream" will not have an appropriate background color.

Step 3: Add the Code
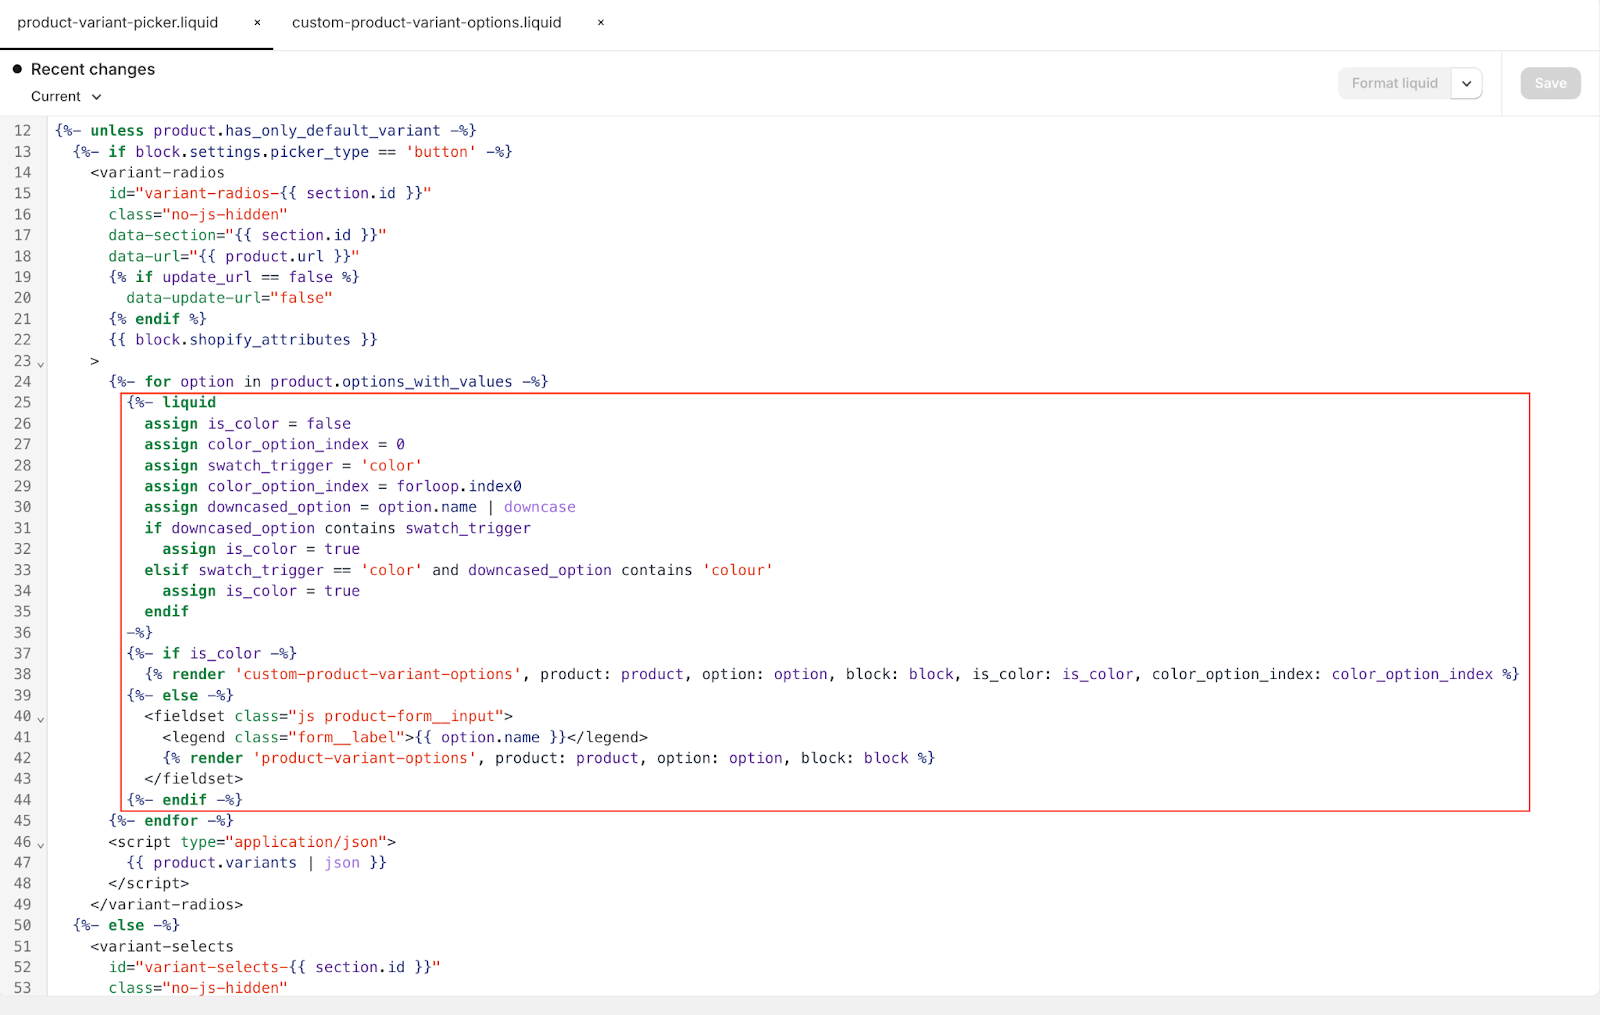
For this example, we are using the Dawn theme. We'll be making three main modifications: first, we will modify the product-variant-picker.liquid snippet to include a conditional statement that checks whether the variant is a color and if so, renders a new snippet for the product swatch linking code. Next, we will create the new Liquid snippet named custom-product-variant-options.liquid which will handle displaying the color swatches and linking the products. Lastly, we will create a new CSS file named custom-product-variant-options.css to style the color swatches.
Modifying product-variant-picker.liquid
Whether you are using the Dawn theme or not, you will need to find the section where it loops through when the picker type is button. Then, add a Liquid tag to assign certain variables and create a conditional statement to check whether it is a color variant. If it is a color variant, render the new snippet. You can reference the screenshot below, where you can find the modifications within the red square.
Creating custom-product-variant-options.liquid
Create a new snippet named custom-product-variant-options.liquid. This snippet will handle displaying the color swatches and linking the products. Include a reference to a new CSS file at the top.
{{ 'custom-product-variant-options.css' | asset_url | stylesheet_tag }}
{%- assign swatch_file_extension = 'png' -%}
{%- assign option_index = forloop.index -%}
<div class="variant-wrapper js" data-type="button">
  <label class="variant__label" for="ProductSelect-{{ section_id }}-{{ product.id }}-option-{{ forloop.index0 }}">
    {{ option.name }}
  </label>
  <fieldset
    class="variant-input-wrap"
    name="{{ option.name }}"
    data-index="option{{ option_index }}"
    data-handle="{{ option.name | handleize }}"
    id="ProductSelect-{{ section_id }}-{{ product.id }}-option-{{ forloop.index0 }}"
  >
    <legend class="hide">{{ option.name }}</legend>
    {%- for value in option.values -%}
      {%- liquid
        assign product_available = true
        if product.options.size == 1
          assign product_available = product.variants[forloop.index0].available
        endif
      -%}
      <div
        class="variant-input"
        data-index="option{{ option_index }}"
        data-value="{{ value | escape }}"
      >
        <input
          type="radio"
          form="{{ form_id }}"
          {% if option.selected_value == value %}
            checked="checked"
          {% endif %}
          value="{{ value | escape }}"
          data-index="option{{ option_index }}"
          name="{{ option.name }}"
          data-variant-input
          class="variant__input--color-swatch"
          data-color-name="{{ value | escape }}"
          data-color-index="{{ color_option_index }}"
          id="ProductSelect-{{ section_id }}-{{ product.id }}-option-{{ option.name | handleize }}-{{ value | url_encode }}"
        >
        {% for tag in product.tags %}
          {% if tag contains '-' %}
            {% assign url = tag %}
            {% if product.handle == url %}
              {%- assign color_swatch_fallback = value | split: ' ' | last | handle -%}
              {% assign color_image = 'swatch-'
                | append: product.handle
                | append: '.'
                | append: swatch_file_extension
                | file_img_url: 'master'
                | prepend: 'https:'
              %}
              <a
                class="swatch-link variant-input loadedproduct"
                href="/products/{{url}}#MainContent?size={{selected_size}}"
              >
                <label
                  for="ProductSelect-{{ section_id }}-option-{{ option.name | handleize }}-{{ value | url_encode }}"
                  data-bg-image="{{ color_image }}"
                  data-alter-image="{{ fallback_image }}"
                  class="variant__button-label active-swatch color-swatch color-swatch--{{ value | handle }}"
                  style="background-image: url({{ color_image }}),url({{ fallback_image }}); background-color: {{ color_swatch_fallback }};"
                >
                  {{ value | escape }}
                </label>
                <span class="variant__label-info">
                  {{ value }}
                </span>
              </a>
            {% else %}
              {% for product_option in all_products[url].options_with_values %}
                {% if product_option.name contains 'color' or product_option.name contains 'Color' %}
                  {% for value in product_option.values %}
                    {%- assign color_swatch_fallback1 = value | split: ' ' | last | handle -%}
                    {% assign color_image = 'swatch-'
                      | append: all_products[url].handle
                      | append: '.'
                      | append: swatch_file_extension
                      | file_img_url: 'master'
                      | prepend: 'https:'
                    %}
                    <a
                      class="swatch-link variant-input otherproducts"
                      href="/products/{{url}}#MainContent?size={{selected_size}}"
                    >
                      <label
                        for="ProductSelect-{{ section_id }}-option-{{ product_option.name | handleize }}-{{ value | url_encode }}"
                        class="variant__button-label color-swatch color-swatch--{{ value | handle }}"
                        data-bg-image="{{ color_image }}"
                        data-alter-image="{{ fallback_image }}"
                        style="background-image: url({{ color_image }}),url({{ fallback_image }}); background-color: {{ color_swatch_fallback1 }};"
                      >
                        {{ value | escape }}
                      </label>
                      <span class="variant__label-info">
                        {{ value }}
                      </span>
                    </a>
                  {% endfor %}
                {% endif %}
              {% endfor %}
            {% endif %}
          {% endif %}
        {% endfor %}
      </div>
    {%- endfor -%}
  </fieldset>
</div>
Creating custom-product-variant-options.css
Create a new CSS file named custom-product-variant-options.css and include the following styles:
.hide {
  display: none;
}

.variant-input-wrap {
  border: 0;
  margin: 0 0 -12px;
  padding: 0;
  position: relative;
}

.variant-input-wrap label:not(.color-swatch) {
  font-size: 12px;
  background-color: transparent;
  margin: 0 7px 12px;
  width: auto;
  height: auto;
  padding: 5px 7px;
  display: -webkit-box;
  display: -ms-flexbox;
  display: flex;
  -webkit-box-pack: center;
      -ms-flex-pack: center;
          justify-content: center;
  -webkit-box-align: center;
      -ms-flex-align: center;
          align-items: center;
  min-width: 30px;
}

.variant-input-wrap label:not(.color-swatch).disabled {
  color: #8a8a8a;
  -webkit-box-shadow: 0 0 0 1px #8a8a8a;
          box-shadow: 0 0 0 1px #8a8a8a;
}

.variant-input-wrap label.disabled:after {
  border-left: none;
}

.variant-input-wrap .color-swatch:before {
  border: none;
}

.variant-wrapper {
  display: -webkit-box;
  display: -ms-flexbox;
  display: flex;
}

a.swatch-link.variant-input {
  position: relative;
}

.swatch-link:focus .variant__label-info,
.swatch-link:hover .variant__label-info {
  opacity: 1;
}

.variant__label-info {
  display: block;
  position: absolute;
  background-color: #fbf8f3;
  padding: 5px;
  -webkit-transition: opacity .1s ease-in-out;
  -o-transition: opacity .1s ease-in-out;
  transition: opacity .1s ease-in-out;
  top: 100%;
  left: 50%;
  -webkit-transform: translate(-50%);
      -ms-transform: translate(-50%);
          transform: translate(-50%);
  white-space: nowrap;
  border: 1px solid #27273f;
  font-size: 12px;
  z-index: 1;
  opacity: 0;
  color: #121212;
}

.variant-wrapper .variant__label,
.product__quantity label {
  width: 15%;
  min-width: -webkit-fit-content;
  min-width: -moz-fit-content;
  min-width: fit-content;
}

.variant-input-wrap,
.js-qty__wrapper {
  width: 50%;
}

.variant-input-wrap .swatch-link label.disabled:after {
  content: none;
}

.variant-input-wrap .otherproducts label {
  -webkit-box-shadow: none !important;
          box-shadow: none !important;
}

.variant-input-wrap .loadedproduct label {
  -webkit-box-shadow: 0 0 0 1px #27273f !important;
          box-shadow: 0 0 0 1px #27273f !important;
}

.variant-input-wrap .active-swatch {
  -webkit-box-shadow: 0 0 0 1px #27273f;
          box-shadow: 0 0 0 1px #27273f;
}

.variant-input input, select, textarea {
  border-color: #27273f;
}

.variant-input-wrap input {
  clip: rect(0,0,0,0);
  overflow: hidden;
  position: absolute;
  height: 1px;
  width: 1px;
}

.variant-input-wrap a:not(.loadedproduct) .color-swatch:before {
  border: none;
}

.color-swatch:before {
    bottom: -1px;
    content: "";
    left: -1px;
    position: absolute;
    right: -1px;
    top: -1px;
    z-index: 2;
    border-radius: 100%;
    border-width: 4px;
    cursor: pointer;
}

.color-swatch {
  background-position: 50%;
  background-repeat: no-repeat;
  background-size: cover;
  -webkit-box-shadow: 0 0 0 1px #27273f;
          box-shadow: 0 0 0 1px #27273f;
  display: block;
  height: 30px;
  margin: 0 4px 4px;
  overflow: hidden;
  position: relative;
  text-indent: -9999px;
  -webkit-transition: -webkit-box-shadow .2s ease;
  transition: -webkit-box-shadow .2s ease;
  -o-transition: box-shadow .2s ease;
  transition: box-shadow .2s ease;
  transition: box-shadow .2s ease, -webkit-box-shadow .2s ease;
  width: 30px;
}

.variant-input {
    display: inline-block;
}

.variant-wrapper {
  display: -webkit-box;
  display: -ms-flexbox;
  display: flex;
  -webkit-box-align: center;
      -ms-flex-align: center;
          align-items: center;
}
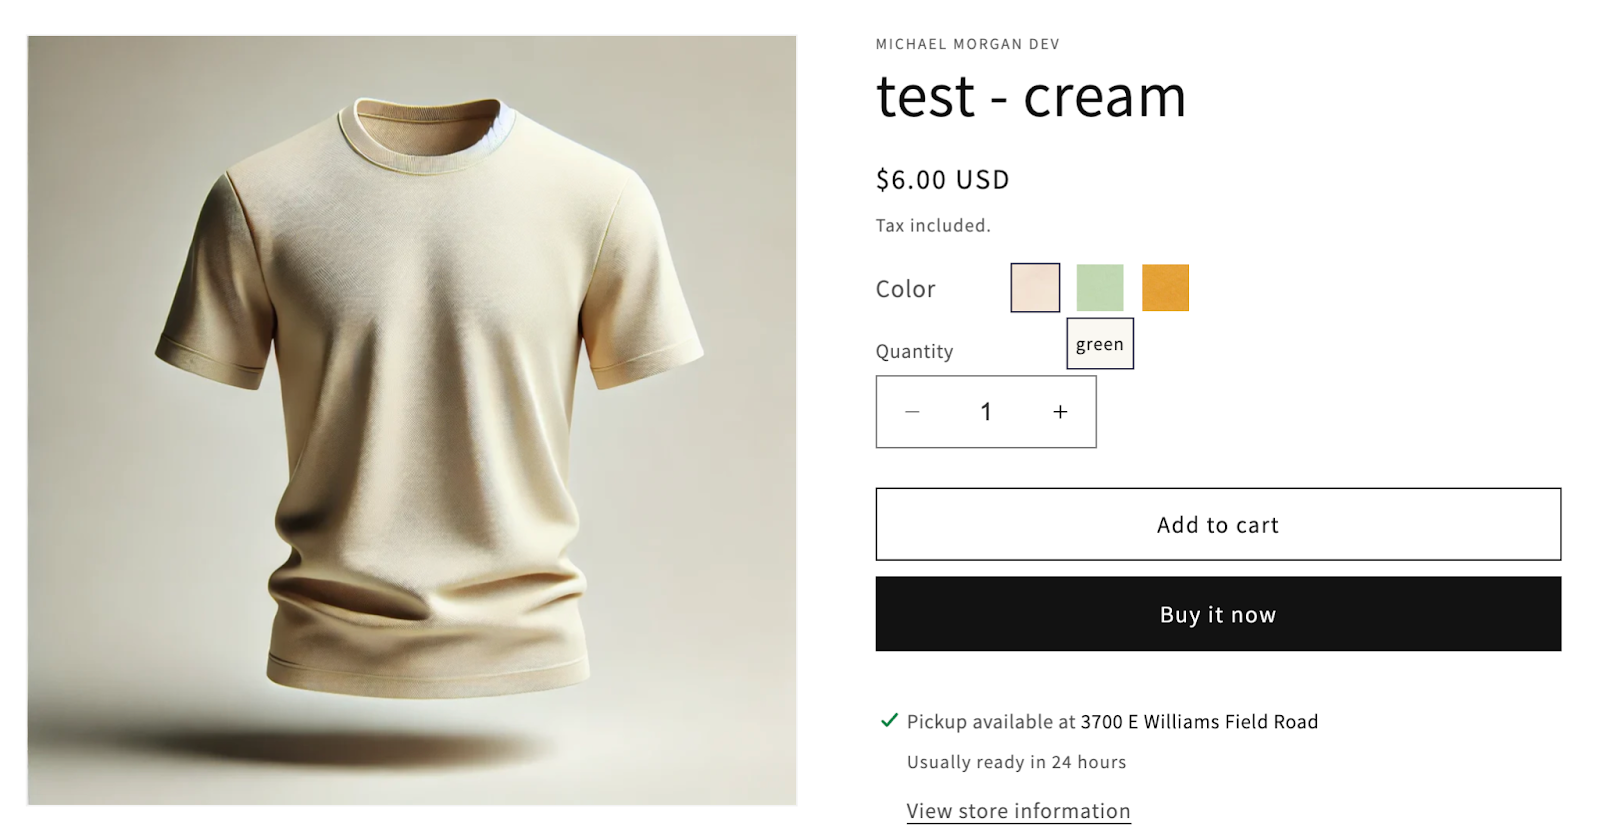
Step 4: Test the Functionality
Once all the code is added, make sure the products are all set to 'active'. Then, preview the theme to ensure everything is working correctly. You should see all the connected products displayed as swatches, similar to the image below. If you are not seeing this, double-check your code for errors and ensure it is set up like the examples provided.
Putting It All Together
After everything is set up and tested, you will have a great functionality to link products together via swatches. This enhancement will provide a seamless and visually appealing way for customers to view and select different product variants, improving their overall shopping experience.
By following these steps, you can ensure that your Shopify store effectively utilizes product swatches to link variants, making it easier for customers to find exactly what they are looking for. If any issues arise, revisit the steps and code snippets to troubleshoot and resolve them.
3 links you can’t miss:
- Loom is a fantastic tool for recording and sharing video messages. I use this as part of my everyday communication with clients. It's handy for providing visual feedback, conducting tutorials, or explaining complex concepts to clients and team members. With Loom, you can easily capture your screen, voice, and face, making communication clearer and more personal. This can significantly enhance remote collaboration and save time compared to written explanations. There are many times when I start typing out an email to a client but then think, "This would be much easier to explain over a quick Loom video." I love it!
- Grammarly is an indispensable writing assistant that helps you produce error-free and polished content. Whether you're writing emails, reports, or blog posts, Grammarly checks your grammar, spelling, and punctuation, and even offers style suggestions. It integrates seamlessly with various platforms, ensuring that your communication is always professional and clear. This is particularly valuable for remote freelancers who need to maintain high standards in their written interactions.
- Slack is a powerful messaging platform designed for team collaboration. It offers channels for different projects, direct messaging, and integrations with numerous other tools. Slack keeps all your communications organized and accessible, enabling real-time collaboration and quick decision-making. I find it especially helpful to organize communication with other developers to collaborate on projects and share ideas about solutions.
1 app I like:
Matrixify is an incredibly useful app for managing and migrating data in Shopify. It allows you to import, export, and update your Shopify store data using Excel or CSV files. This app is great for bulk editing products, orders, customers, and other data, saving you countless hours. Whether you're setting up a new store, managing inventory, or handling large-scale updates, Matrixify simplifies complex tasks and boosts your productivity. This app has saved me countless hours when I’ve needed to migrate clients from other platforms to Shopify!


Shopify Expert?


