6 ways to to Customize the Shopify Checkout

If you’re looking for ways to enhance and customize the Shopify checkout, you’re not alone. Your checkout experience is one of the most important parts of your store. After all, almost 70% of all shoppers add products to their cart, then abandon a purchase at checkout.
This means it’s not the products, or the rest of your website that’s potentially losing you money, but the design of your checkout page.
While Shopify provides every company with a high-performing (and high-converting) checkout solution, customization can help you take your customer’s experience to the next level. The right customization methods can help you showcase your brand, increase conversions, and minimize that pesky cart abandonment rate.
So, how can you customize your checkout? Let’s find out.
X Ways to Customize the Shopify Checkout
You might have noticed most checkouts on Shopify stores are pretty similar. The page is divided into two parts, one for payment and shipping information, and the other for the order summary. Unfortunately, you can’t change this checkout logic and structure, unless you have a Shopify Plus plan. Only enterprise users can edit the checkout.liquid template.
If you want to make specific changes to how your checkout works, we recommend working with a Shopify expert with extensive Liquid expertise.
However, if you don’t want to upgrade to a Plus plan, there are still some ways you can alter your checkout to make it more unique. Here are some of our top ideas:
- Implement More Payment Methods
While Shopify’s default payment gateway, Shopify Payments, is fantastic, offering a wider range of payment methods can be an excellent way to reduce cart abandonment rates. One of the top reasons shoppers abandon their carts is lack of access to their preferred payment method. Consider adding options for PayPal, Stripe, and even buy-now-pay-later solutions to your store.
You can use Shopify’s “Pay” option to simplify the payment experience with one-click checkouts, or leverage the dedicated BNPL solution “Shopify Pay Instalments” if you want to avoid paying extra transaction fees when customers purchase a product.
We’d recommend doing some research into the kind of payment methods your customers prefer before diving in with a specific solution, as this will ensure you’re not wasting time and money.
- Adjust the Checkout Forms
One way you can customize your Shopify checkout experience, and simplify things for your customers, is to reduce the number of form fields they need to fill in to make a payment. One way to do this is to simply use Shop Pay to create a “one-click” checkout function, so customers only need to enter their payment details once.
Alternatively, you can head to your Shopify admin account, and click on “Checkout” within Store Settings. In the customer information section, choose the specific information you want to ask for, such as contact details, and address information.
It’s a simple change, but it can make the overall experience feel more straightforward and user-friendly for your audience. Here’s an example of a streamlined checkout to explore:
- Showcase Your Brand
The options you have to highlight your brand on your checkout page are limited with most Shopify plans. You can change your checkout header, or customize fonts and colors, but that’s about it.
However, Shopify’s “Checkout Editor” now allows companies to make more specific customizations to their checkout.
You can add a header and your logo to your checkout without any developer support. Or you can work with an expert to leverage extra changes through the Shopify branding API. The branding API allows for more possibilities in your checkout, such as adding a favicon, or changing the border radius on fields and buttons in your checkout.
Notably, to access this API, you will need either a “Development Store” plan, or a Shopify Plus plan. That means it can be a relatively expensive option.
- Use Shopify Checkout Apps
One of the best things about Shopify, is that it integrates with a wide range of apps and tools that can give you more control over your customer’s checkout and shopping experience. You can even use tools like “Bold” to create a headless checkout experience.
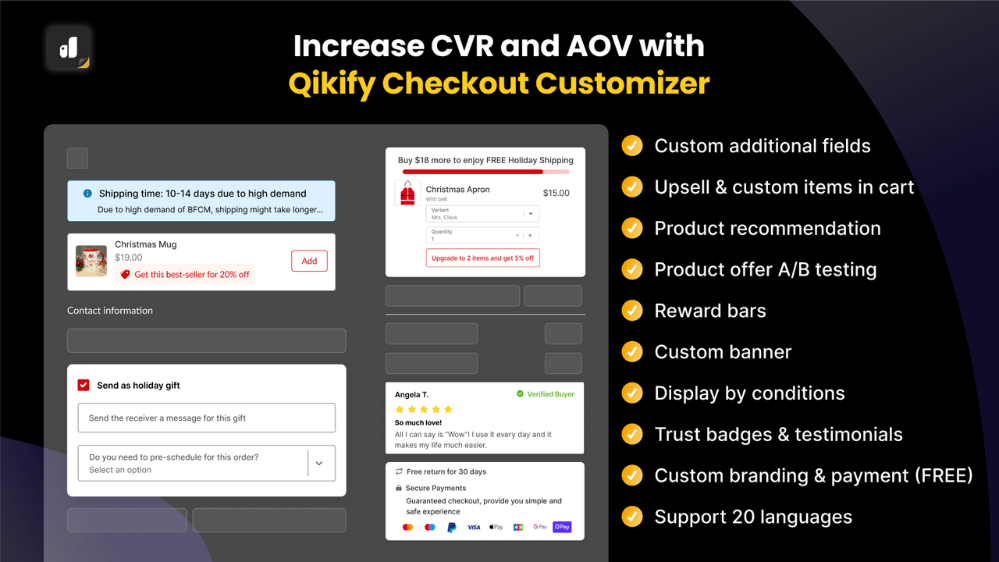
Some apps only give you basic features, like the option to customize checkout rules, while others can offer opportunities to add up-sells and cross-sells to your checkout page. For instance the Qikify checkout customizer gives you access to custom banners, upsell and custom items in carts, custom additional fields, and custom branding options.
You can also experiment with popular options like the “Checkout Blocks” app, for banners and new form fields, or the “Checkout Buddy” app. Just make sure the app you choose works well with your Shopify theme, and doesn’t cost too much to integrate.
Shopify even has it’s own collection of “Checkout” apps that it suggests to customers, such as Snapchat integrations, and Smile loyalty and rewards.
- Use Post-Purchase Apps
The checkout experience doesn’t have to stop after your customers make a purchase. Just as you can increase your changes of higher average order values and conversions with customized product pages, like this:
https://resources.storetasker.com/shopify-examples/true-classic-bundle
You can also create a post-purchase page after your customer completes the checkout process, to thank them for their purchase, and offer access to additional products.
Post-purchase upsell and conversion tools like Honeycomb, and ReConvert make it easy to convince your customers to spend more with personalized upsell recommendations. You can allow them to add more products to their carts with one click, show exclusive offers, and more.
Plus, you can use your post-checkout pages to run surveys, collect information from your audience members (for email nurturing campaigns) and more.
- Leverage Shopify Functions
Shopify Functions allow companies to extend and replace various parts of Shopify’s backend logic using custom code. This means you can add custom discounts to checkout pages, discount combinations, new payment methods, and shipping rules. Developers build apps which use Shopify functions, so you can access all of this functionality without having to touch the code yourself.
You can use functions to create new discount types, delivery customizations, cart and checkout validations, order routing location rules, and custom bundles.
Currently, all Shopify plans have the option to add Shopify Functions to their store by installing an app. However, if you upgrade to the Shopify Plus plan, you’ll be able to work with developers to create exclusive Shopify functions for your business needs.
Bonus Tip: Use Analytics to Optimize your Checkout
All of the strategies above give you ways to customize your checkout, but if you really want to ensure you’re making the most of this crucial feature for your online store, it’s worth taking an additional step. Using your Shopify analytics, as well as additional tools like “pixels” on Shopify, you can learn more about how your checkout customizations are affecting your users.
Pixels allow you to track customer behavior through the checkout process, which can give you more granular insights into the purchasing experience.
The easiest way to get started is to leverage an app from the Shopify app store, such as Elevar Conversion Tracking, or Attribuly attribution. However, you can also work with developers to add custom pixels to your site.
Ready to Customize your Shopify Checkout?
Unfortunately, finding ways to customize the Shopify checkout can be complicated on some plans. Unless you have a Shopify Plus plan, it’s difficult to make truly unique changes to the overall experience your customers get. However, there are still some steps you can take to add unique branding elements, change headers and fonts, and add unique apps to boost the experience.
If you want to take things a step further, the best option is to invest in Shopify Plus, and seek the support of a Shopify expert. Reach out to Storetasker to find an expert who can help you optimize your checkout and improve your conversion rates.


Shopify Expert?


