How To Create An Email Marketing Campaign On Shopify
As a Shopify store owner, one of the most important things you can do is find ways to capture, engage, and nurture your customers. As a pretty comprehensive platform for ecommerce companies, Shopify does offer a range of tools to help you boost your chances of conversions.
For instance, you can leverage Shopify’s built-in SEO capabilities and blogging tools to boost your chances of ranking for crucial keywords on the search engine result pages. There’s also the option to connect your Shopify store with various social media channels (such as Facebook), so you can reach out to clients on the platforms they’re already using.
Another option is to embrace the art of email marketing, with Shopify.
While email marketing might not seem like the most exciting way to engage and convert customers, it’s one of the most lucrative tools any business leader can access. In fact, according to some studies, email is 40 times more effective at acquiring customers than Facebook and Twitter combined.
Plus, with automated email campaigns, you can consistently connect with your target audience before, during, and after they make a purchase, boosting your chances of increased customer lifetime value, and brand loyalty.
So, how do you start building email marketing campaigns on Shopify?
Here’s everything you need to know.
Your Options for Email Marketing with Shopify
The first thing you should know, is there are two ways to start building email marketing campaigns as a Shopify store owner. First, thanks to Shopify’s fantastic app marketplace, you can download and integrate a host of email marketing tools with your existing store.
This is a great option if you’re already using an email marketing automation tool like MailChimp or SendInBlue, as you don’t necessarily have to get started from scratch. Plus, specialist email marketing automation apps generally include a lot of great features to explore, like premium templates, pipelines, and more. Here are some great email apps worth checking out:
- Drip: Email marketing and pop-up campaigns
- Omnisend: For email marketing and SMS campaigns
- Sendinblue: For affordable, comprehensive email marketing
The other option, if you want to keep as much of your sales and marketing strategy in Shopify as possible, is to install and use the Shopify Email app.
This allows you to add email marketing functionality to your store, without accessing any third-party tools. The app is available to use for free, for your first 10,000 manual or automated emails. After that, you’ll pay $1 for every 1,000 emails you send.
Let’s start by looking at how you can use the Shopify email marketing app.
How to Create an Email Marketing Campaign with the Shopify App
Using the Shopify email marketing app is probably the easiest way to dive into email marketing with Shopify. All you need to do to get started is go to the Shopify Email app page, and click “add app”. Log into your Shopify account, and click “Install app” when you’re ready.
Keep in mind, you will need an active Shopify account or trial to access the email app. If you’re on a trial plan, you’ll need to pick a payment plan before you can send any emails.
After the installation, there’s no real set-up process to worry about, as Shopify will automatically:
- Enable segmentation for your existing and future customers
- Sync your products and their details to your email account
- All you to leverage automations and workflows
- Pulls all of your email form subscription details into your contact list
However, you will be responsible for creating your own campaigns. You can also change some other settings before you get started. For instance, you’ll be able to change your sender email address if you want to include a specific address in the “from” field to your customers.
Step 1: Creating Your Email Campaign
Once you have your Shopify email app installed, creating a campaign is a pretty straightforward process. There’s really no need to worry about messing around with code, so you shouldn’t need to access any professional developer help.
To begin creating your campaigns, log into your Shopify admin account, and click on “Marketing”, or go into “Apps”, then “Shopify Email”. Click on the “Create an email campaign” button.

This will take you to a page where you can choose a template for your email. There are a huge list of options to choose from, designed for different use cases. For instance, you can search for emails related to product restocks, upcoming events, new entries to your store, and more.
There’s also a button on the top-right corner of the templates page which allows you to save a template and ensure it stays consistent across your entire campaign.
Step 2: Building your Campaigns
Once you’ve selected an email template that works for you, it’s time to start editing the components of your email. You’ll be taken to the email campaign editor within Shopify.
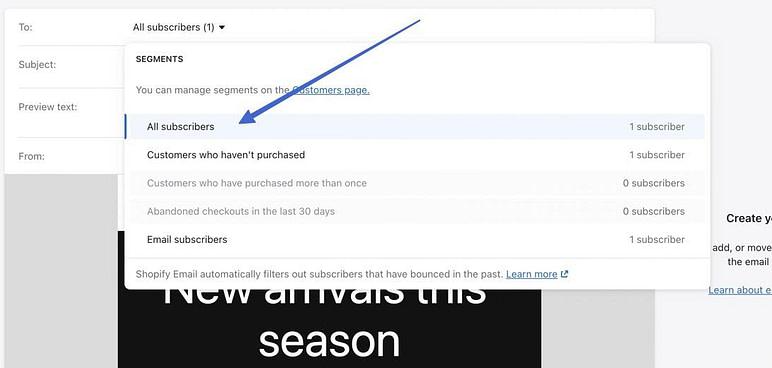
The first thing you should do is click on the “To” dropdown menu, so you can select the audience you want to send your emails to.
After that, fill in the subject line, and preview text fields underneath the “To” section.
Now, you’re ready to start moving through your template and making changes.
Within the email campaign editor, you can add sections by using your mouse to hover over the area where you want a new section, then clicking the “+” button. You can also remove a section from your email content by opening your editing options, and clicking the trash can.
Users can also drag sections around to move them to different positions.

Clicking into a section will allow you upload new images, change the text, content type, and colors, and even add other components, such as buttons to drive customers to a specific store page.
Overall, the Shopify email campaign editor will allow you to access content modules for:
- Text: Such as the body of your email
- Buttons: Linked to specific pages on your website.
- Images: Uploaded from your computer, or from the Shopify library
- Dividers: To break up sections of your emails
- Columns: To separate content into sections
- Images with text: Images with additional text components
You can also include discounts and gift cards within your emails, or upload product information for a promotional message straight from your Shopify store. Depending on the type of Shopify account you have, you may also be able to experiment with custom Liquid and HTML code. However, the code you enter can’t exceed 50KB in size, so keep this in mind.
Shopify emails can also include product carousels (with up to 9 images), as well as an express checkout function, provided your store is already set up with Shop Pay.
Step 3: Testing and Sending your Emails
Once you’re happy with the overall design and contents of your email campaign, the only thing left to do is test, and send it to your customers. Start by clicking the “Send Test” button, to preview the email exactly how your customer are going to see it. This will send a version of your new email to the address associated with your Shopify store.
You can also click “Review” to see a list of all of the campaign elements you might want to check before you’re ready to send anything. Once you’re happy, you can decide whether you want to send the campaign instantly, or schedule it to be sent at a specific time.
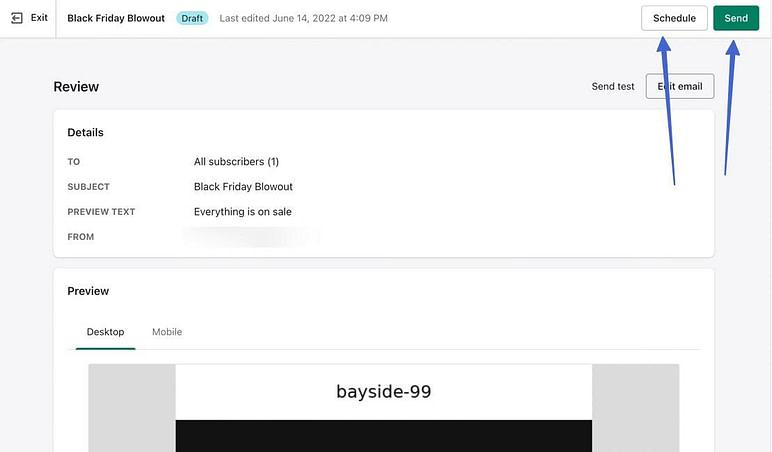
If you click the “Schedule” button, you’ll see a pop-up with two fields for entering the send date, and the time when you want the email to be sent (in your local time zone). Click the schedule button when you’re ready to go.
Email Marketing with Shopify
As you can see, getting started with an email marketing campaign on Shopify is a lot simpler than you might think. Just keep in mind the Shopify embedded email app is a little basic, so it might not be the right option for every business. If you want to create more comprehensive email campaigns, you might want to consider visiting the Shopify app market and choosing an integration - or to make things easier, take a look at this curated list from 1-800-D2C.
Each email app for Shopify has it’s own functionality, and a slightly different set of instructions to follow when getting everything set up. However, you should find most options are easy to use.
Good luck starting your new email marketing journey.


Shopify Expert?


