How to Edit Google Merchant Fields in Shopify

There’s more to building the ultimate Shopify store than choosing the right theme, or editing your checkout and product pages to ensure you’re giving your customers the best user experience. As any expert Shopify developer or Shopify store manager will tell you, making a Shopify site successful involves a lot of different types of work.
One of the most important things you’ll need to do, to boost your chances of sales and brand visibility, is ensure you’re leveraging the right tools to showcase your products to customers. For instance, thanks to Shopify’s integration with Google Analytics and similar tools, you can increase your exposure to new customers by adding product data to your Google Merchant Center account.
The Google Merchant Center allows store owners to access a free platform, where they can showcase their products and solutions to customers in search of specific terms. Once you add your Shopify product data to the Google Merchant Center, your business and its products can show up across the Google landscape, in Google Maps, Google Search, the Shopping tab, YouTube, and more.
So, how do you start editing Google Merchant fields on Shopify?
Editing Google Product Data Within Shopify
The good news is you don’t necessarily need to be a coding expert to update your product data for the Google Merchant Center with Shopify. However, you will need to commit a little time to the process.
For certain product categories, such as footwear or clothing, there are various required fields you’ll need to fill out. If you miss out any essential data, you’ll be rejected from the Google promotional channels, or you might have reduced visibility online. It’s also worth making sure you regularly update these fields within Shopify whenever you make changes to your product pages.
The good news is you can make changes to some fields in bulk (we’ll show you how to do that in a minute). For the meantime, let’s look at editing a single product.
Editing a Product’s Google Data in Shopify
Like with most edits made to your online store, the first thing you’ll need to do is sign into Shopify with your admin account. Once you’re logged in, navigate to the “My Store” section, and click on “Products” in the left-hand menu on the screen.
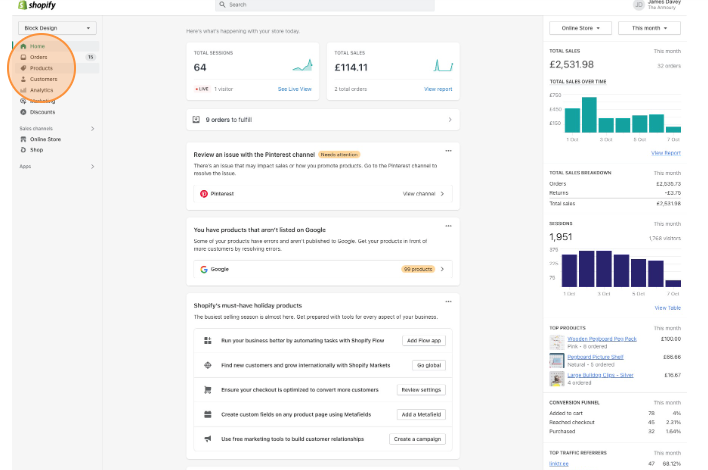
Next, you’ll need to look for the product with the data you want to edit. You can use the “Filter products” search bar on Shopify to sort through all of your pictures pretty quickly. Click on the name of the product you want to edit, then select “More Actions” from the top right of the page.
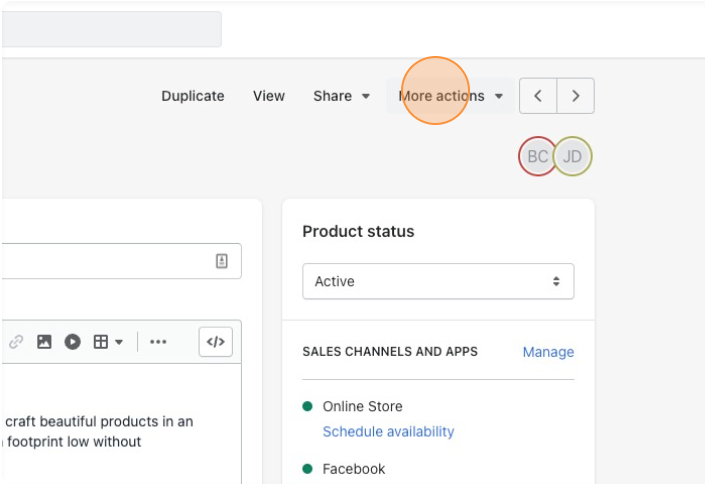
When the drop-down box appears, you’ll see a variety of options, including the choice to view reviews for the product and add custom fields. Click on the “Google Fields” option.
If you’re the company responsible for creating the product on your store, you can click the checkbox next to the option for “This is a custom product”. Otherwise, you’ll need to enter the Manufacturer Part Number or SKU into the field below. You’ll also need an SKU number if you’ve created your own product, so keep this in mind.
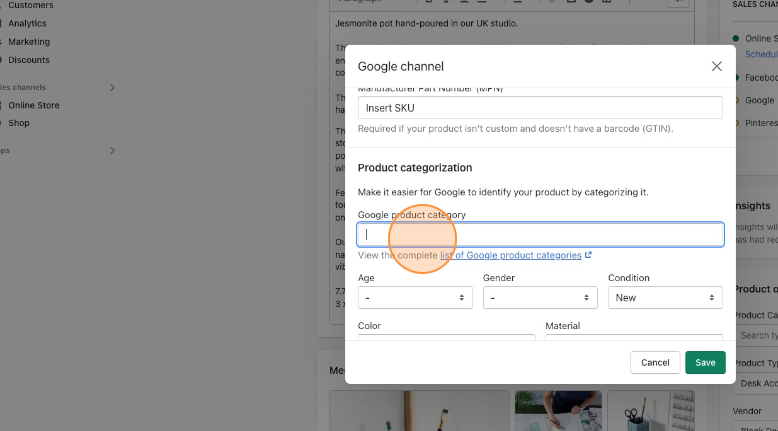
Fill out the custom fields in the pop-up box for your Google Merchant Center account, starting with the Google Product Category. You’ll have a list of options to choose from, provided directly by Google. Once you save the product category number, it will automatically change to Google’s own nested product categorization format.
For certain products, such as clothing and footwear, specific information will also be required. For instance, you’ll need to choose an age from a variety of ranges provided by Google, as well as a Gender, and the condition of the product. You can find a full list of the specific fields you need to fill out depending on your product category here.
You may also need to add information about:
- The color of your product (just the name is required)
- The material the product is made with (you can enter up to 3 options)
- The size value for your product (if you’re selling a clothing item)
- The size system you’re using, such as UK or US sizing
- The size type, such as tall, petite, or maternity clothing
Editing Multiple Google Merchant Fields at Once
While the process of editing Google Merchant fields in Shopify is relatively straightforward, it can be quite time-consuming, particularly if you have a lot of products to update. If you’re selling a lot of products which have the same characteristics, you can also choose to edit multiple fields at once. This can save you a lot of time and effort.
Once again, to do this, log into your Shopify admin account, and return to the “Products” section. Next, click on the “Sales channel” tab in the left-hand menu, and select “Google” from the dropdown menu provided. You’ll be given a handful of product options to choose from, separated into your Approved, Not Approved, and Pending products.

Select your category, then when you arrive on your new page, click on the checkmark box next to each of the products you want to edit. You can select as many items as you want before you click the “Edit Products” tab to enter the Shopify bulk editor.
The bulk editor gives you access to a comprehensive spreadsheet-style environment, where you can work your way through all of your products, adding the relevant data for each one. You’ll have a range of tabs available to choose from which allow you to change information about the product’s intended age group, gender, and so on.

Although this does speed things up quite a bit, you’ll still need to enter a lot of details manually, such as SKU codes for each product, so it doesn’t remove the work entirely. Crucially, you’ll also need to make sure you don’t click away from the page at any time, as this could mean you lose your progress.
Once you’re done making all of your changes, click the “Save Changes” button on the page, and all of the information on your store should be automatically updated.
If you still find the bulk editor on Shopify to be too time consuming, you can always consider using a third-party app to help you. There are various tools on the Shopify app store that can assist with boosting the search engine positioning of your products.
One of the most popular options is the Ablester Bulk product editor, which allows you to quickly import your own spreadsheets with product data into Shopify directly. Alternatively, you could consider hiring a Shopify store manager to assist you with the whole process.
Editing Google Merchant Fields on Shopify
As you can see from the guide above, editing your Google Merchant fields so you can position your products and business in front of customers across the web is relatively straightforward. However, it’s a pretty time-consuming and sometimes frustrating process too. Even using the bulk editor will take a little time, so it’s worth considering a third-party app if you’re getting frustrated.
Do keep in mind that some of the apps available for bulk product updates will also incur an additional fee, depending on the services you want to access.
If you need a little more help with managing and creating your Shopify store, why not seek out some support from a Shopify Expert? Reach out to Storetasker today to find the professional best-suited to transforming your Shopify site.


Shopify Expert?


