A Complete Guide To Adding The Meta Pixel To Shopify
Learning how to add the Meta pixel to your Shopify store is an excellent way to improve your Shopify marketing efforts. Used correctly, the pixel can provide you with valuable data you can use to reduce your ad spend, increase your advertising success rate, and re-target customers.
The more data you collect from your pixel, the more you’ll be able to update your campaigns to connect with your target audience, and improve your ROI.
But what exactly is the Meta Pixel, what can it do, and how do you add it to your Shopify store? Read on for answers to all of those questions.
What is the Meta Pixel?
The Meta Pixel is a retargeting pixel, created by the Meta company (previously Facebook). Essentially, it’s a free analytical tool you can add to your site in the form of a piece of code. It helps Facebook to track users, and see how they interact with website content.
Tracked interactions, known as “Events”, look at everything from customer purchases, to lead generation opportunities, registrations, add-to-cart actions, checkout processes and more.
The events monitored by the Meta pixel generally fall into two categories: standard events, and custom events. Standard events are the default actions you can track with the pixel without giving it any specific instructions. Custom events give you more freedom into what you monitor.
For instance, you can track specific clicks on certain links, or monitor how certain groups behave on your Shopify website.
Why Add Meta Pixel to Your Shopify Store?
The Meta Pixel can only provide you with limited data about your Facebook audiences and social media followers, but it can still be an extremely valuable tool. It allows companies to get a better idea of how well their Facebook ads are performing. You can also use the pixel to retarget site visitors with Facebook ads, drawing them back to your product pages and blogs.
The Meta pixel even allows users to build audiences for Facebook based on how visitors respond to their ads, and what they do on certain site pages. Integrating the pixel into your Shopify store means you can:
- Learn more about your customers: Analyzing what customers do on your website, and what actions they don’t take will help you to understand their buying journey.
- Create more targeted ads: The data Meta shares with Instagram and Facebook makes it easier to fine-tune your audiences on each of these platforms.
- Reduce your ad costs: When you know more about your audience, you can create more targeted ads, which usually cost less to create and run.
- Boost your Facebook ad performance: With your Meta Pixel, you can monitor the effectiveness of your ads, and determine how to improve your campaigns.
- Guide Facebook: If you track enough events and conversions on your store, you can tell Facebook to optimize ads for specific actions you want users to take on your site.
How to Add the Meta Pixel to your Shopify Store
The good news is adding the Meta pixel to your Shopify store is usually a relatively straightforward process. You’ll need to log into both your Facebook and Shopify accounts to do this.
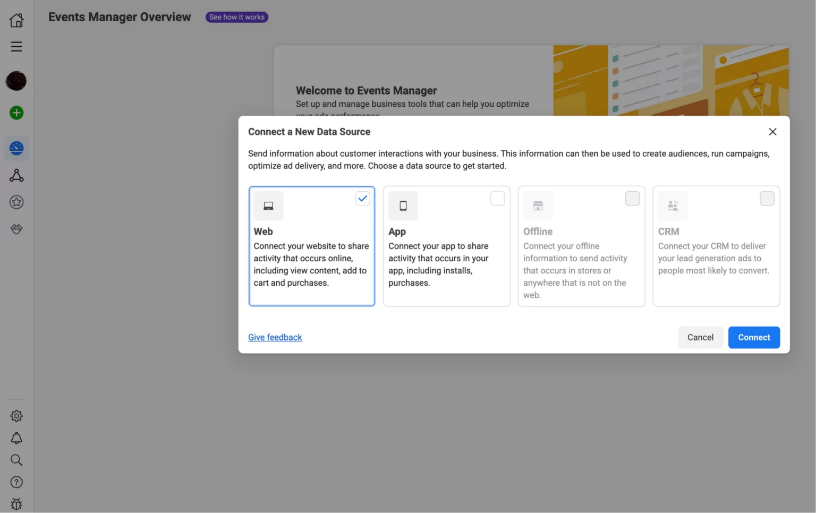
Start by going to your Facebook Business page, and open the Facebook Events Manager admin section. You can connect the admin panel to your store by selecting the “Connect data source” option, and providing your Shopify data. Choose “Web” as your source.
Once you’ve selected the “Web” option, you’ll be asked to name your pixel. This basically just makes it easier to know what you’re tracking, particularly if you’re using multiple pixels on different sites.
After you give your pixel a name, you’ll be asked to enter the URL for your Shopify store, so Facebook can check whether there’s an integration available. Fortunately, Facebook and Shopify do have an integration already.
Next, you’ll need to choose how you want to connect your site to Facebook. The best option is usually to choose the “Meta Pixel and Conversions API” option.

This option will allow you to maintain more accurate data on your ad campaigns now that Apple has updated its operating system to block pixels from collecting on-site information. The Conversions API addresses the iOS updates, as well as the changes to Google’s third-party cookies policies.
It sends first-party data from your servers directly to Facebook for you. This means instead of sharing browser info with Facebook; the API shares the data your customers have agreed to share.
After you’ve picked your connection option, choose your partner set-up strategy. You’ll be able to either connect directly to your partner (Shopify) or manually install the pixel. While you can install your pixel manually relatively easily, it’s simpler to just use the partner option.
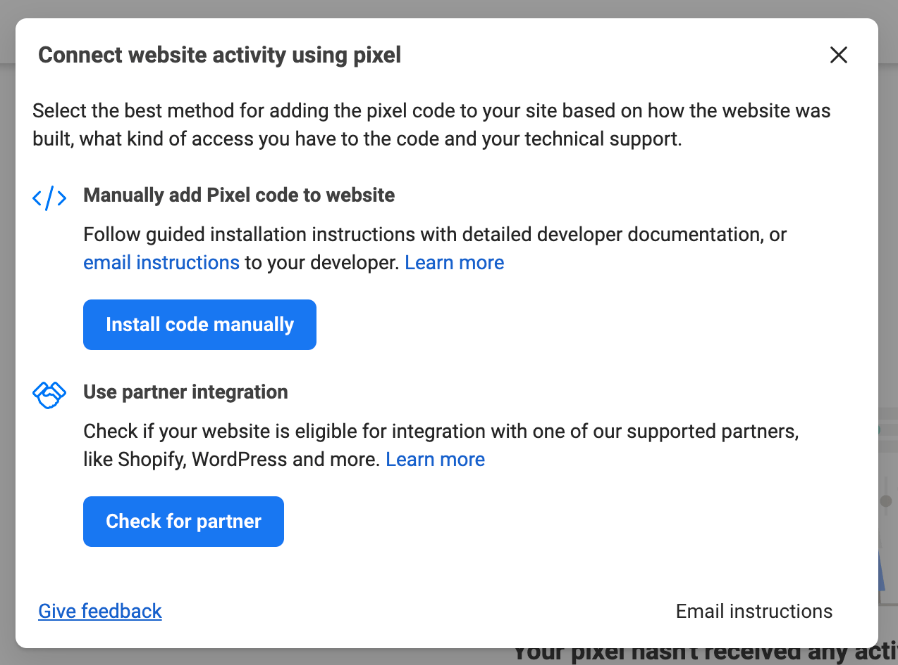
Click “Check for Partner” and you’ll be able to select Shopify from the list that appears. This will officially create your Meta Pixel, and link it to your store.
Setting the Pixel Up in your Shopify Store
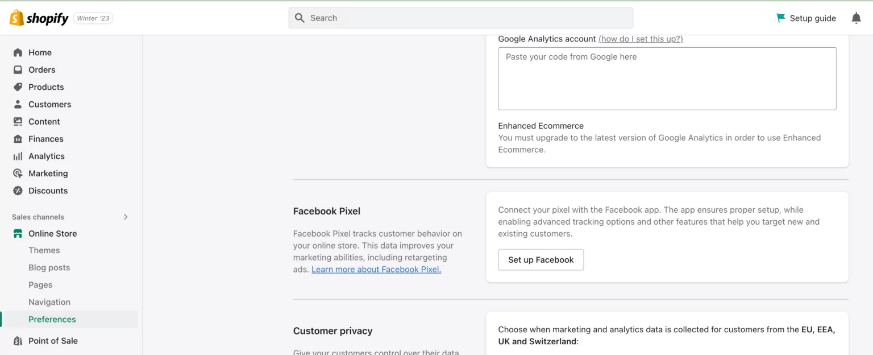
After you’ve finished all the steps above, you’ll need to add Facebook and Instagram sales channels to your Shopify store to get the most out of your new pixel. You can do this pretty quickly, by visiting your Shopify admin panel. Click on “Preferences” and scroll through the page until you see a section for the “Facebook Pixel”.
Select “Set up Facebook”, and Shopify will automatically redirect you to the setup page. You’ll be able to walk through the step-by-step process of setting up your sales channels. Once you’ve done that, you’ll also need to establish your data preferences.
It’ll be up to you to decide exactly how much of your customer’s data to share with Facebook. If you opt for the “Maximum” option, you should be able to create more targeted ads. However, depending on where you are in the world, you may be exposed to more privacy and security requirements.

After you’ve chosen your data preferences, you can add your pixel directly to your Shopify store. The Shopify admin should show you your pixel ID on a pop-up screen, which you can confirm.
Notably, if you’re concerned about the complex process of setting up a pixel within Facebook, you can choose to create your pixel in Shopify instead. Shopify gives you the option to “create a new pixel” when it shows you your pixel options following the guidelines above.
Making the Most of the Meta Pixel
After you’ve added your Meta pixel to your Shopify store, there’s nothing to do but sit back and wait for the data to start rolling in. it’s worth checking on your pixel analytics as often as possible, so you can learn more about your audience, and create more targeted ads.
The more information the pixel collects, the more you’ll benefit from it when it comes to creating and implementing your marketing campaigns. Facebook will give you new options for creating lookalike and custom audiences, based on the data you gather.
If you’re struggling to implement a pixel into your Shopify store, or you want to implement other strategies for online marketing, it might be worth talking to a Shopify expert.
A Shopify Expert from Storetasker will be able to not only help you integrate social media and other marketing tools into your store, but ensure you can make the most of your campaigns.
Reach out to Storetasker today to learn more about hiring your own Shopify expert.


Shopify Expert?


