How to Edit The CSS Of A Shopify Theme
Your Shopify theme is one of the most important parts of your ecommerce website. It influences everything from how your website delivers an amazing customer experience, to how your pages look on different devices. While there are plenty of Shopify themes (both free and paid) you can use out-of-the-box, editing your theme is a crucial way of differentiating your store.
The good news is you don’t necessarily need to know a lot about coding to start editing your theme. Shopify offers built-in tools and editors which allow you to make basic changes to your site’s content and layout. However, even with a premium Shopify theme, you’ll be limited in the edits you can make without diving into the theme’s codebase.
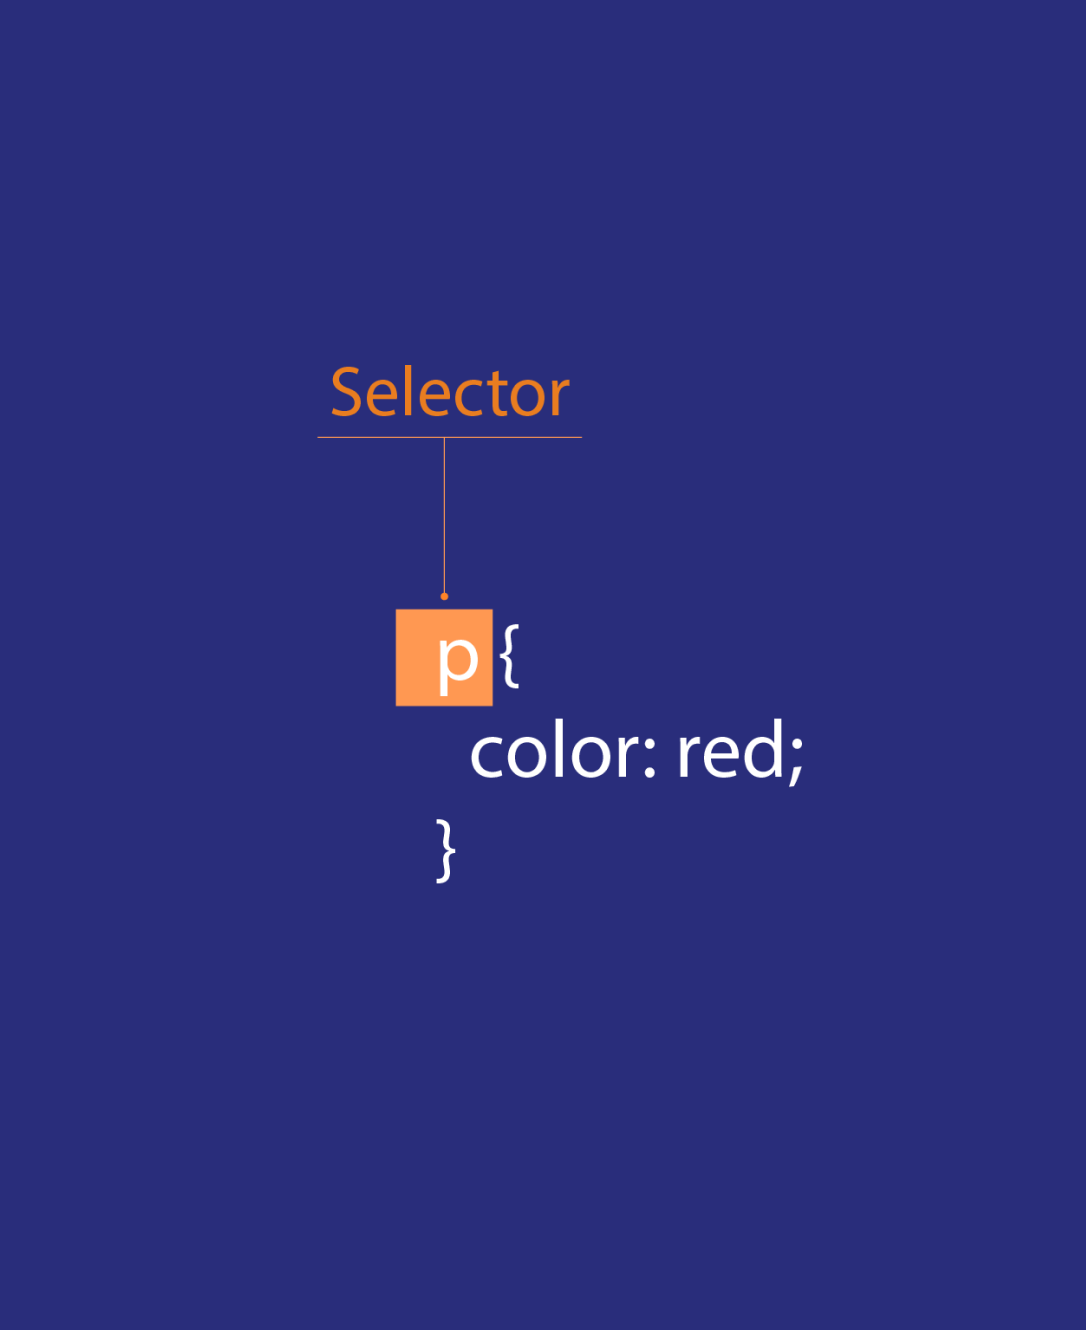
Depending on the theme you use, and the customizations you want to make, you may need to learn how to navigate everything from Liquid, Shopify’s own code solution, to HTML and CSS.
While HTML is the hard-coded skeleton used for all web pages, which determines the basic structure of a page, CSS influences how the pages work for your users. So, how do you get started if you want to make changes to the CSS on your Shopify store?
What to Do Before Editing your Shopify Store CSS
We’d always recommend working with a professional unless you’re confident you’re an expert in CSS, HTML, and Liquid. However, if you really want to try editing code yourself, there’s another step you’ll need to take to ensure you can protect yourself: backing up your store.
You should always duplicate and save your Shopify theme as it is before you start making to any changes to your code. This ensures you have a backup copy you’ll be able to use if anything doesn’t go according to plan. Fortunately, duplicating your theme is a relatively straightforward process.
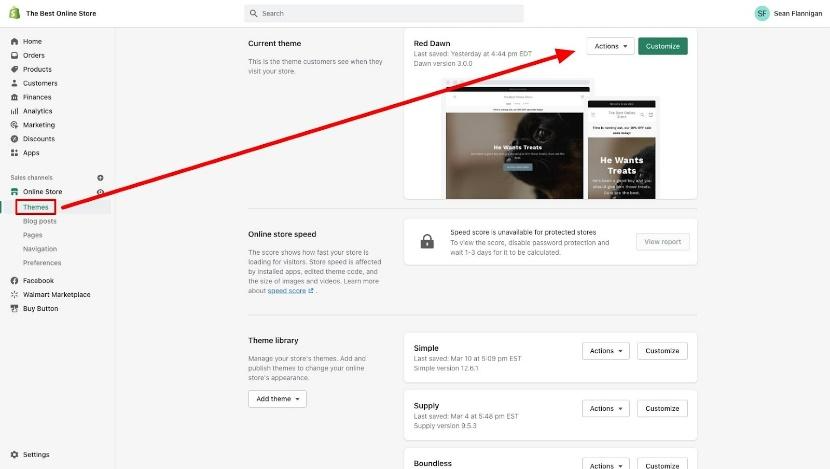
All you need to do is visit the Themes section on your Shopify store admin account, and click on the Actions menu for the theme you’re currently using. You’ll see the “Duplicate” option listed in the menu here. It’s worth giving the backup a unique name so you know which version you’re going to revert back to if something goes wrong with your new code.
How to Edit Shopify CSS Code: The Basics
Most of the time, if you’re just making simple changes to your Shopify store, you’ll be able to use the built-in theme editor on the platform, which doesn’t require you to mess with any code at all. However, if you want to dive into things like CSS and HTML, you’re going to need to use a different tool – the code editor. As usual when making changes to Shopify, you’ll need to start by logging into your Shopify dashboard, and clicking on the “Online Store” tab.
From there, click on “Themes”, and find the theme you want to edit. Make sure you back up your theme first. Trust us, you’ll thank yourself later.
Click on the “Actions” tab next to your chosen theme, and scroll down until you see “Edit Code”.
Once you click on this option, you’ll be directed to the Shopify code editor. This page will show you all of the code for the pages of your store on the right hand side, then the navigation menu for your pages on the left. Once you’re in the code editor, collapse the “Templates” folder, which will appear by default, to find the “Assets” folder.
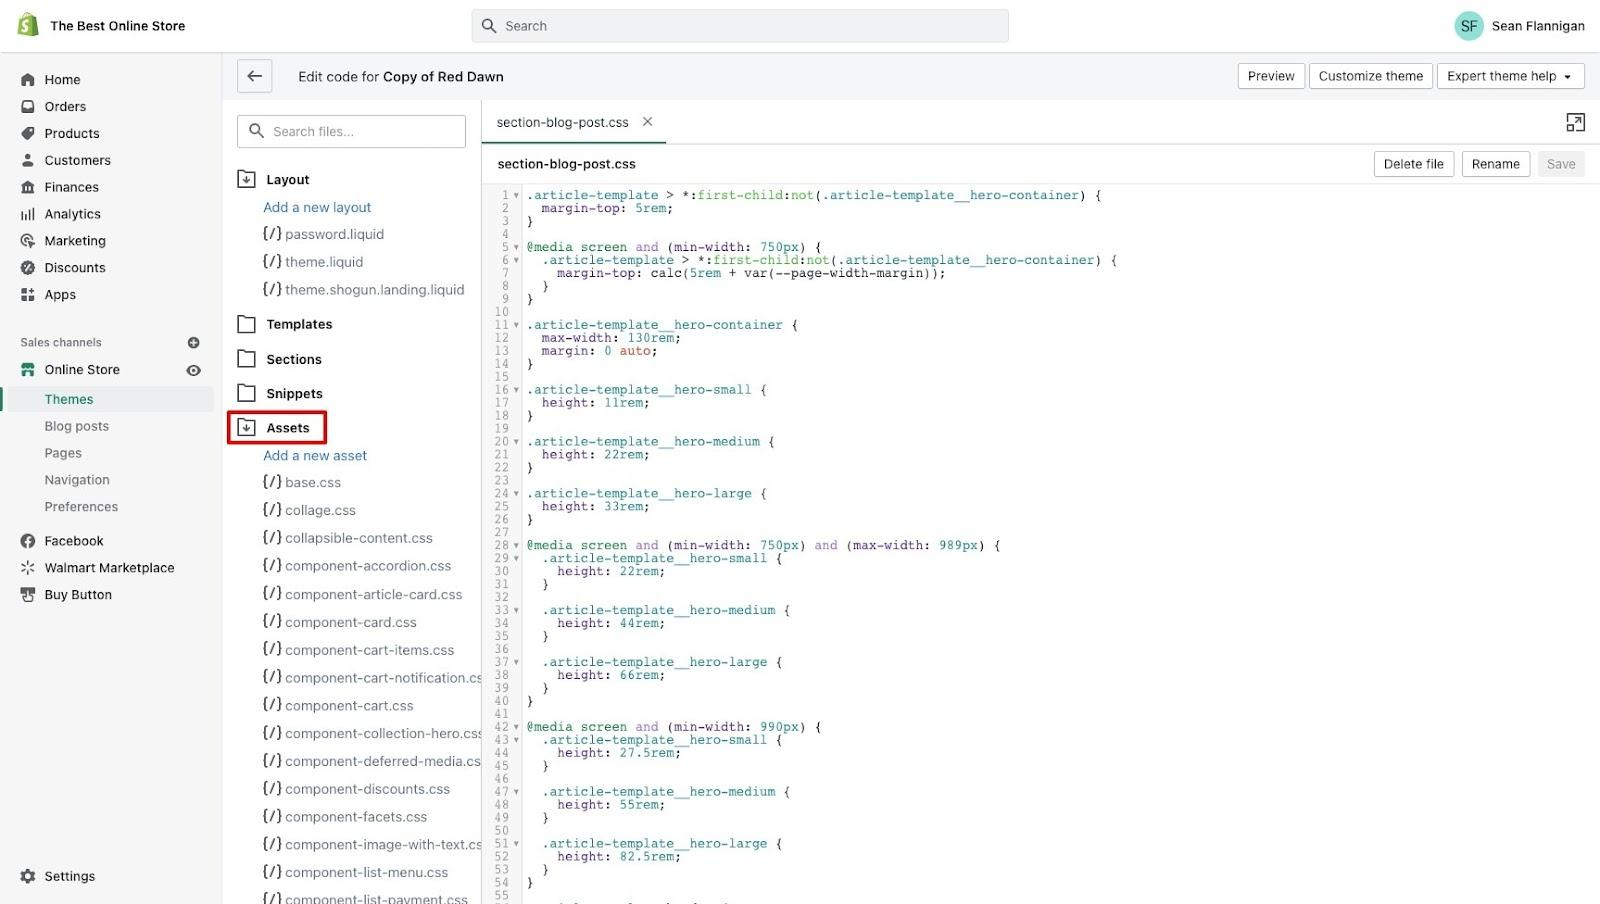
Click on this to reveal the various folders contained within your theme. You should be able to find the CSS folder here. There will be a ton of different files within the folder, which appear as tabs within your editing window, so you can customize various different aspects of your theme at once.
Once you’re here, you can make any of the changes you like to your CSS, throughout each of the pages of your website. Make sure you’re cautious about the changes you make. We recommend only implementing small changes, one at a time, to ensure everything continues to work.
Editing Existing CSS Within Shopify
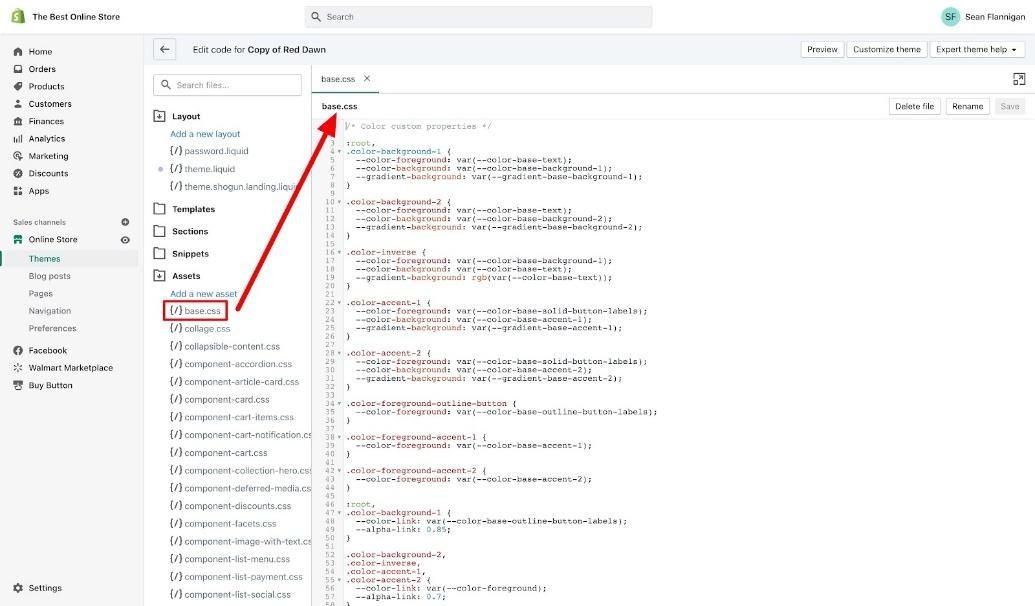
If you want to make simple CSS edits to the files within your Shopify theme, all you need to do is find the specific CSS file you want to adapt. The exact name for the files you’ll want may vary depending on the theme you choose. For instance, in the Dawn theme, the main CSS file will usually be titled “Base.CSS”. However, other themes might use options like “Theme.CSS”.
Open the core CSS file, and you’ll see a window appear on the main editor screen, with a tab so you can keep track of the core file when you’re moving through other files.
Within your core CSS file, search for the name of the element on your website you want to edit. The best way to make sure you know what to search for is to open your Shopify store in a different tab within your browser. Right-click on any element you want to make changes on, and click the “Inspect” button. This will showcase the CSS attributes in use for that component.
Using the information you find; you’ll be able to make changes within your Shopify file. If you want to try making edits without actually affecting your theme, you can make changes to the CSS within the Inspect window, to see how the changes would affect your store.
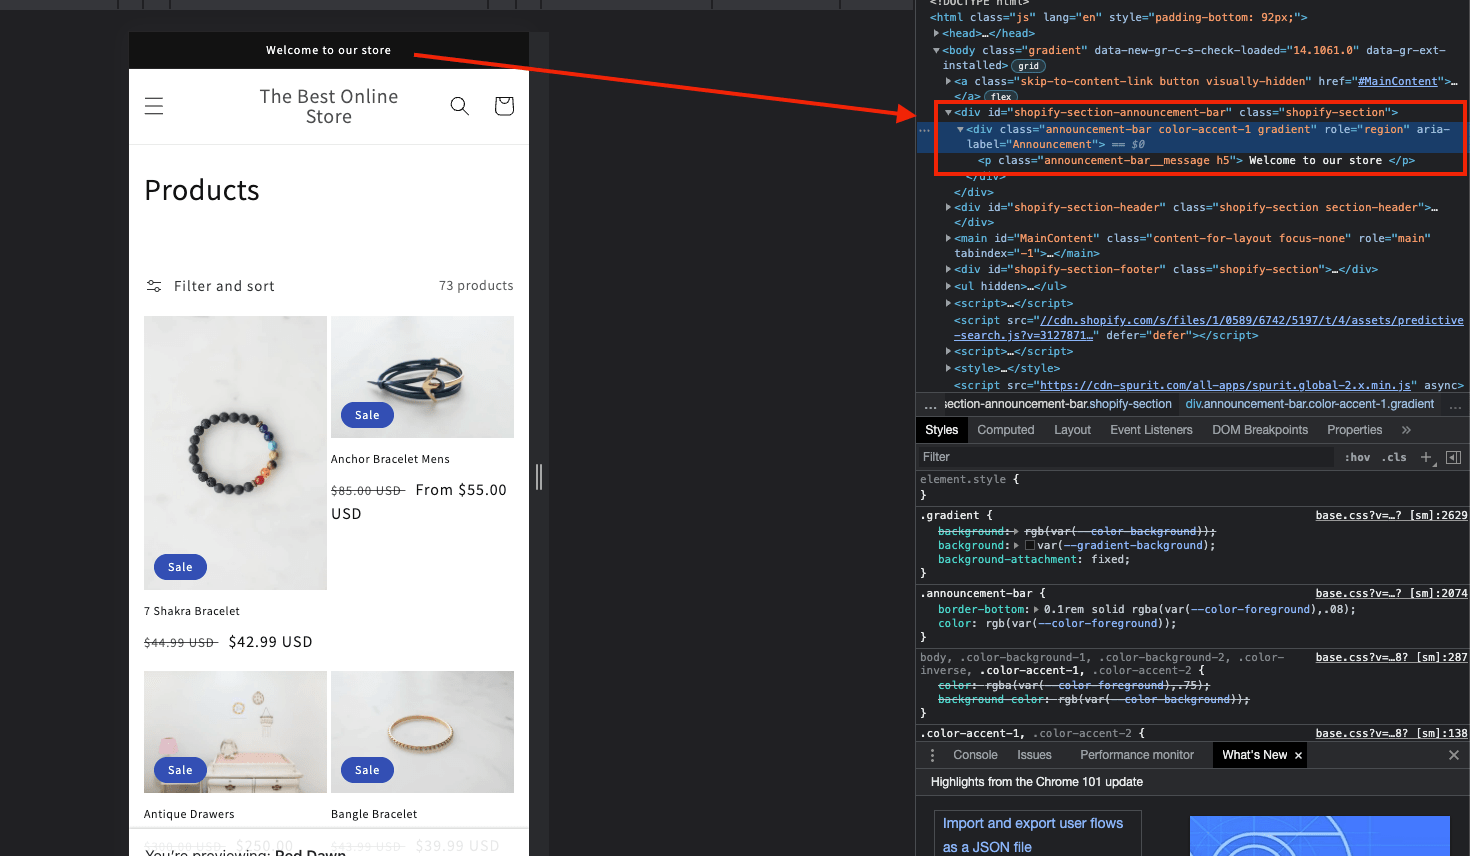
To search for a CSS element within your core CSS file, click on the search bar within your Shopify code editor, and enter the information you have. You can also use the Ctrl+F (PC) or Command+F (Mac) short keys to search.
Make your changes to the chosen component, then click the “Save” button within the code editor to apply them to your store. You’ll then be able to click on the “Preview” button to see how your alterations have influenced the design of your website.
How to Create New CSS Files in Shopify
Aside from editing the CSS components already included within your Shopify theme, you’ll also be able to create new custom Shopify files for your CSS requirements. This is actually a pretty straightforward process. Using the steps outlined above, go back to your Shopify code editor within the theme you want to edit, and head to the “Assets” folder.
Here, you’ll see an option at the top of the list of assets which allows you to “Add a New Asset”. Click this to create your new CSS file.
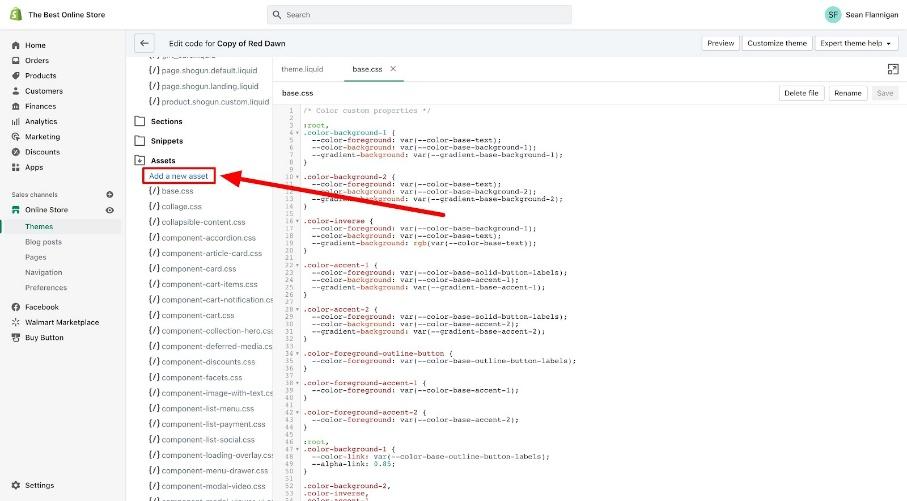
Once you have your new file, you can select it, and click on either “Create a blank file” option to start building your CSS from scratch, or choose the “Upload a file” tab to upload a CSS file from your computer. You can choose to title your file however you like.
One important step to keep in mind here is you’ll need to make sure the CSS code you implement does use duplicate naming conventions to the core CSS file. Once you’ve created your new CSS file, you’ll need to reference it within the theme file to ensure it works on your store. This means adding your CSS to the Liquid file.
Go to your “Layout” folder, and select the “theme.liquid” file from the selection of options.

Scroll down to the point where it asks for the “base.css” file, or the core CSS file name for your theme, and copy the line of code for your base.css to paste below that line. Replace the filename with the custom CSS filename.
Click save, and you’re done!
Editing your Shopify CSS
Ultimately, unless you have the right technical know-how, it’s always best to leave in-depth Shopify code editing to the professionals. With various different nuances to be aware of, it’s easy to make a mistake with your Shopify code that can damage the entire performance of your store.
If you want help customizing and enhancing your Shopify store theme, you can find an expert to assist you right here at Storetasker. Start searching for your Shopify expert today!
BONUS: Here's a great tutorial video ;)


Shopify Expert?


