How to Customize Your Shopify Store Emails: The Easy Way

Shopify is a great ecommerce platform for a number of reasons. Not only does it give you a flexible way to build your own custom online store, and blog, but it also provides you with the tools you need to engage and retain customers. For instance, when you sign up for a Shopify account and create your store, you’ll gain instant access to “notifications” you can send to your customers.
These notifications, delivered in either email or SMS form, are triggered whenever a customer completes a specific action on your store, such as placing an order. The good news is the basic emails Shopify sends on your behalf are pretty attractive and effective. However, there’s a good chance you’re still going to want to customize them to match your brand.
Fortunately, it’s pretty straightforward to add your own ideal color palette, fonts, language requirements, and even your logo to your Shopify messages.
Let’s look at how you can get started.
How to Brand and Customize Shopify Store Emails
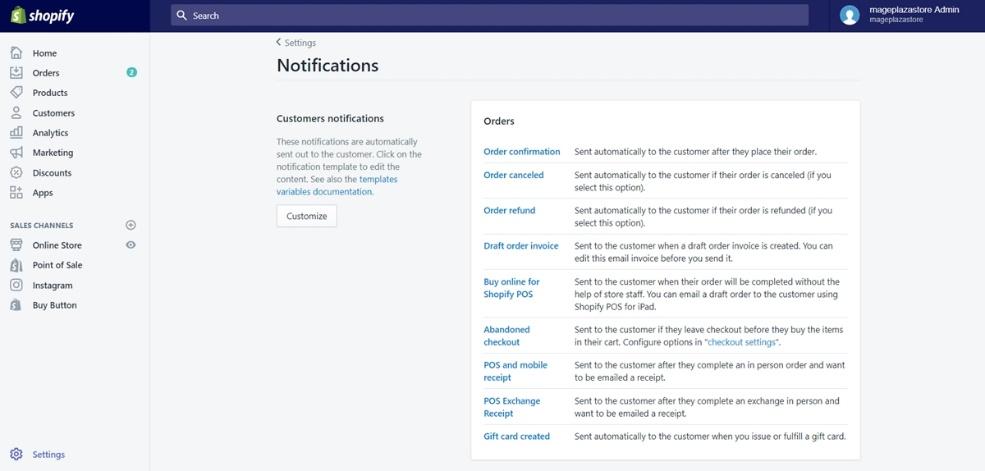
As standard, Shopify gives business owners a variety of ways to customize their emails according to their specific requirements. You can start making changes without any coding knowledge, apps, or experience. Just head into your Shopify Admin account, click on “Settings” then “Notifications”.
Within the notifications segment, you’ll be able to:
- Add your logo: Click on “Customize” in the Notifications section of your Shopify admin account, and you’ll see an option to upload a file. Here, you can add your business logo file, and implement it into all of your email templates.
- Adjust your brand colors: You’ll also be able to update the colors used in your emails to match your preferred color palette. Just click on “Customize” again, and you’ll be able to enter the specific color codes for the shades you want to use. There’s an RGB to Hex feature depending on the data you have for your color palette.
- Change your language: The default language your email templates will appear in will often depend on your theme’s language. If you want to change your email language, you’ll also need to change your theme settings. If you don’t want to change all of your theme languages and email templates at once, you can just update the title of your emails.
- Add custom messages: Shopify offers simple pre-made templates for abandoned checkout messages, contact customers, and confirming orders. However, you can choose to change this message by clicking into your email templates and adjusting the body of the email.
Before you save any changes to your emails, it’s worth double-checking everything works as it’s supposed to. You can do this by clicking on “Actions” then choosing “Preview within Shopify”. If you’re happy with what you see, you can also send a test email through Shopify, which will arrive in the email inbox associated with your admin account.
How to Customize Specific Email Templates in Shopify
Aside from making bulk changes to your Shopify store emails, you can also customize specific templates. Shopify has a range of templates to choose from for abandoned cart emails, transaction notices, and other use cases. To access your email templates and start editing them individually, go into your Settings page and click on “Notifications”.

Within the Notifications page, click on the “Customer Notifications” option. On the right-hand side, you’ll see a list of different types of notification messages you can send, such as Orders, Shipping, and Customer contact emails. Click on the template you want to adjust to start editing.
After you click on the specific template you want to edit, you’ll be directed to a new page, where you can change the email subject and email body for the template. Things can get a little tricky here, as you might need to start making some changes to code.
Here are some steps to get you started:
- Step 1: Copy the code into a HTML code editor: You can copy and paste the HTML from the template you choose on Shopify into your favorite code editor to start making changes. This can be helpful if you’re not familiar with using the Shopify landscape for coding.
- Step 2: Upload relevant files: Shopify has its own “files” feature where you can upload images and other content. It’s worth uploading some crucial images, like your logo, social media icons, and any other images you want to constantly include in templates. Once your images are uploaded, you can take the URLs from Shopify to add them to your email HTML.
- Step 3: Make your edits: Referencing the original template taken from Shopify, copy/paste the liquid variables and logic over to your new email template. You can then change the preheader text, update your social icon links, replace the content with your own custom message, and make other custom changes.
- Step 4: Copy the code back into Shopify: Once you’re done editing in your own HTML editor, copy everything back to your Shopify email template. From there, you can once again preview the email template before you save everything, and send yourself a test email.
-
Other Ways to Customize Shopify Emails
Outside of updating the overall email messages you use to include your logo and chosen brand colors, and making changes to specific email templates, there are a few other ways to you can customize your Shopify messages. One option is to simply integrate your Shopify store with an existing email automation app like MailChimp or Constant Contact.
This way, you’ll be able to customize and adjust all of your emails in your automation tool of choice, and automatically transfer everything over to your Shopify account.
Another option is to use an app within the Shopify marketplace to help you customize your email templates, and make more advanced changes. Some popular options include:
- The Klaviyo Email template creator: This free app allows users to choose from a range of templates they can use to enhance their email messages in Shopify. There’s no coding required. All you need to do is pick a design you want and perform a little drag-and-drop editing. It’s a pretty simple solution, but it’s not always available on the Shopify app store.
- Spently email marketing: The Spently email marketing app is a bit of an all-in-one solution for editing Shopify emails. It offers free email templates for things like order confirmation, and also provides a paid plan for email automation needs.
- Orderly emails: Orderly emails helps you improve the professional quality of your email templates, with highly customizable designs. You can choose from a range of templates to get started with, and experiment as much as you like with different layouts and features. The app is free to install, but will have an extra charge connected to it if you want to unlock more features or explore a wider range of templates.
Making the Most of your Shopify Store Emails
The basic Shopify store emails included with your Shopify account are a great way to keep your brand connected with your target audience. They ensure you can keep every customer up to date on the status of their order, and even improve your chances of sales with abandoned cart messages.
However, the templates included do require a little bit of editing if you want to make sure they match your brand identity. Need a little more help mastering Shopify? Consider reaching out to the experts at Storetasker today, and access the assistance of a fully trained Shopify specialist.


Shopify Expert?


